What is a Cron Job / Schedule Job?
A Cron Job is a type of task scheduler or automated task system. This means you can write a command or script on the server that will automatically run at specific intervals or at specific times.
Examples:
- Taking database backups every night at 12 AM.
- Making an API call every 5 minutes.
- Sending emails to clients every Monday morning.
You don't have to do these tasks manually. Cron will automate them for you.
How do Cron Jobs work?
In Linux/Unix systems, a cron daemon (crond) runs in the background at all times.
It keeps track of who should run which tasks when.
The schedules you write are stored in a crontab file.
What is Crontab?
Crontab (cron table) is the configuration file where you write when which tasks should run.
You can edit it using the crontab -e command.
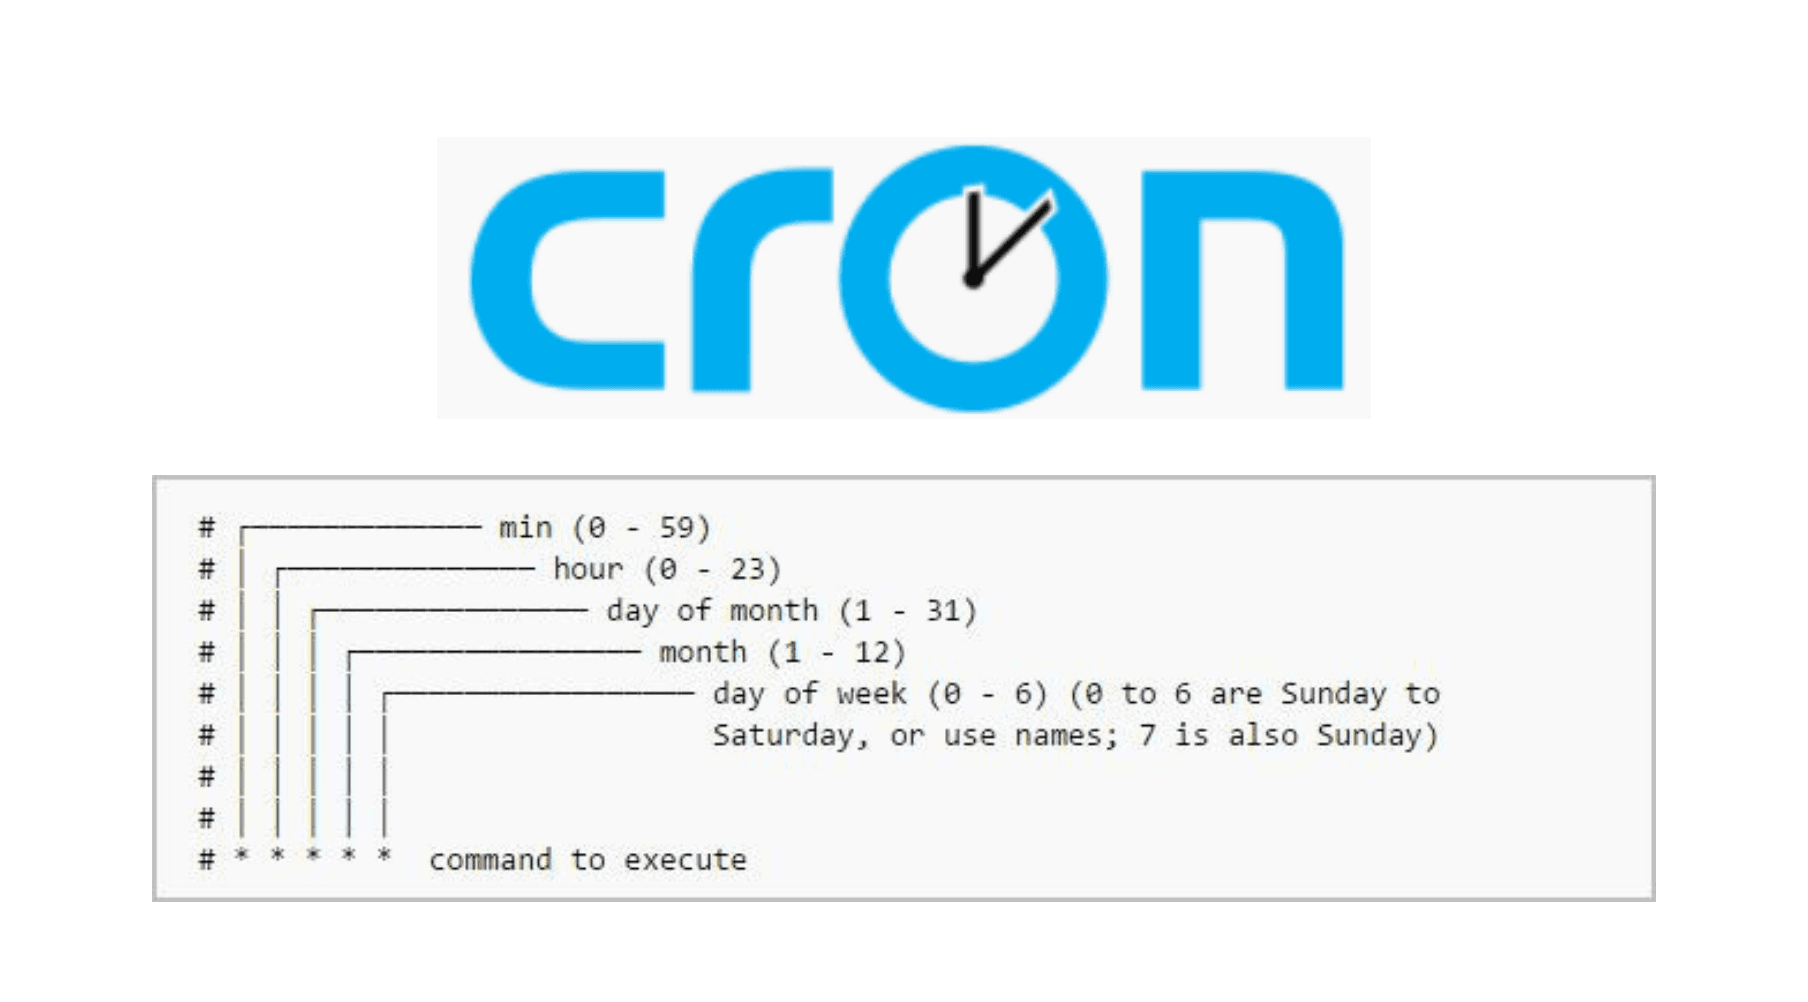
Cron Job Syntax
* * * * * command_to_execute
- - - - -
| | | | |
| | | | +----- Day of the week (0 - 7) [Sunday = 0 or 7]
| | | +------- Month (1 - 12)
| | +--------- Day of the month (1 - 31)
| +----------- Hour (0 - 23)
+------------- Minute (0 - 59)
Cron Expression Examples (Cheat Sheet)
* * * * *→ Every minute*/5 * * * *→ Every 5 minutes0 * * * *→ Every hour0 0 * * *→ Every day at midnight0 9 * * 1→ Every Monday at 9 AM
Examples
- Running a task every minute
* * * * * echo "Hello World"
- Running a task every hour
0 * * * * /path/to/script.sh
- Running a task every night at midnight
0 0 * * * /usr/bin/python3 /home/user/backup.py
- Running a task every Monday at 9 AM
0 9 * * 1 /path/to/send_report.sh
- Running a task every 5 minutes
*/5 * * * * /path/to/your/command
Uses of Cron Jobs
- ✅ Taking database backups
- ✅ Sending emails/notifications
- ✅ Deleting log files
- ✅ Fetching API/data
- ✅ Generating reports
Commands to Check Cron Jobs
crontab -l→ Lists all cron jobscrontab -e→ Add new jobssystemctl status cronorservice cron status→ Check if cron service is running
Difference between Cron Job and Scheduler
- Cron Job → Usually runs on Linux/Unix servers.
- Scheduler (like Node.js, Laravel, NestJS, Django Celery, etc.) → These are application-level schedulers. They work the same way, but manage scheduling at the code level.
So if you want to do server-side automation, you can use Cron Jobs. And if you use frameworks (Node.js, Laravel, NestJS), you can also use the framework's built-in scheduler.
Cron/Scheduler With Express.js
If you want to build a scheduler with Express.js (Node.js), Express doesn't provide anything directly. However, we can use Node Scheduler libraries.
The most popular ones are node-cron or node-schedule
Let's see step by step.
Step 1: Create Express Project
mkdir express-cron-example
cd express-cron-example
npm init -y
npm install express node-cron
Step 2: Create server.js file
import express from "express";
import cron from "node-cron";

const app = express();
const PORT = 3000;

// Simple route
app.get("/", (req, res) => {
  res.send("Cron Job Example Running!");
});

// ✅ Cron Job Example: Shows message in console every 5 minutes
cron.schedule("*/5 * * * *", () => {
  console.log("⏰ This task runs every 5 minutes");
});

// ✅ Task runs every day at midnight
cron.schedule("0 0 * * *", () => {
  console.log("📦 Daily backup job running at midnight...");
});

app.listen(PORT, () => {
  console.log(`🚀 Server running on http://localhost:${PORT}`);
});
Step 3: Run it
node server.js
- Keep the Express server running
- Cron jobs will run automatically in the background.
Practical Example (API call)
Let's say you want to make an API call every 10 minutes:
import fetch from "node-fetch";
import cron from "node-cron";

cron.schedule("*/10 * * * *", async () => {
  const res = await fetch("https://jsonplaceholder.typicode.com/todos/1");
  const data = await res.json();
  console.log("Fetched Data:", data);
});
This way you can create as many scheduled tasks as you want inside your Express.js server.
Cron/Scheduler with NestJS
Creating schedulers in NestJS is much easier than Express because NestJS has an official package @nestjs/schedule
Let's see step by step:
Step 1: Install packages
npm install --save @nestjs/schedule
npm install --save-dev @types/cron
Step 2: Import in AppModule
// app.module.ts
import { Module } from '@nestjs/common';
import { ScheduleModule } from '@nestjs/schedule';
import { TasksModule } from './tasks/tasks.module';

@Module({
  imports: [
    ScheduleModule.forRoot(), // ✅ Scheduler enabled
    TasksModule,
  ],
})
export class AppModule {}
Step 3: Create Task Module
nest g module tasks
nest g service tasks
Step 4: Write Scheduler
// tasks.service.ts
import { Injectable, Logger } from '@nestjs/common';
import { Cron, Interval, Timeout } from '@nestjs/schedule';

@Injectable()
export class TasksService {
  private readonly logger = new Logger(TasksService.name);

  // ✅ Task runs every minute
  @Cron('* * * * *')
  handleCron() {
    this.logger.debug('⏰ Called every minute');
  }

  // ✅ Task runs every 10 seconds
  @Interval(10000)
  handleInterval() {
    this.logger.debug('⚡ Called every 10 seconds');
  }

  // ✅ Runs once 5 seconds after app starts
  @Timeout(5000)
  handleTimeout() {
    this.logger.debug('🚀 Called once after 5 seconds');
  }
}
Step 5: Run it
npm run start:dev
You'll see logs printing every minute/10 seconds in the console.
Cron Expression Examples (Same for NestJS)
* * * * *→ Every minute*/5 * * * *→ Every 5 minutes0 * * * *→ Every hour0 0 * * *→ Every day at midnight0 9 * * 1→ Every Monday at 9 AM
Using @nestjs/schedule in NestJS keeps the code structured, and you can manage Cron / Interval / Timeout everything nicely with decorators.
Practical Example
Let's see a Practical NestJS Scheduler Example — where database backup happens every night at midnight and Stripe API is hit every 5 minutes.
Step 1: Install dependency
npm install --save @nestjs/schedule
npm install --save-dev @types/cron
Step 2: Add ScheduleModule to AppModule
// app.module.ts
import { Module } from '@nestjs/common';
import { ScheduleModule } from '@nestjs/schedule';
import { TasksModule } from './tasks/tasks.module';

@Module({
  imports: [
    ScheduleModule.forRoot(),
    TasksModule, // 👈 Our scheduler task module
  ],
})
export class AppModule {}
Step 3: Create Task Module + Service
nest g module tasks
nest g service tasks
Step 4: Write Task Service
// tasks.service.ts
import { Injectable, Logger } from '@nestjs/common';
import { Cron, CronExpression } from '@nestjs/schedule';
import fetch from 'node-fetch';

@Injectable()
export class TasksService {
  private readonly logger = new Logger(TasksService.name);

  // ✅ Database backup every night at midnight
  @Cron(CronExpression.EVERY_DAY_AT_MIDNIGHT)
  async handleDatabaseBackup() {
    this.logger.debug('📦 Starting daily database backup...');
    // Put your DB backup logic here
    // For example, creating a file
    // fs.writeFileSync(`/backups/db-${Date.now()}.sql`, dbDump);
    this.logger.debug('✅ Database backup completed!');
  }

  // ✅ Hit Stripe API every 5 minutes
  @Cron('*/5 * * * *')
  async handleStripeCheck() {
    this.logger.debug('💳 Checking Stripe API...');
    try {
      const res = await fetch('https://api.stripe.com/v1/charges', {
        headers: {
          Authorization: `Bearer ${process.env.STRIPE_SECRET_KEY}`, // Get your secret key from env
        },
      });
      const data = await res.json();
      this.logger.debug(`✅ Stripe data fetched. Found ${data.data?.length || 0} charges`);
    } catch (err) {
      this.logger.error('❌ Stripe API call failed', err.message);
    }
  }
}
Step 5: Run it
npm run start:dev
- Backup log will come every night at midnight.
- Stripe API will be hit every 5 minutes.
Common CronExpression (NestJS built-in)
NestJS provides some ready expressions:
CronExpression.EVERY_MINUTE→ Every minuteCronExpression.EVERY_5_MINUTES→ Every 5 minutesCronExpression.EVERY_DAY_AT_MIDNIGHT→ Every day at midnightCronExpression.EVERY_HOUR→ Every hour
Let's see how to save database backup (MySQL or Postgres) as a file using NestJS scheduler?
Concept
- Every night at midnight (cron job) will run backup command.
- This command uses
mysqldump(for MySQL) orpg_dump(for Postgres) to create.sqlfile. - File will be saved in
/backupsfolder.
Step 1: Install extra packages
npm install --save @nestjs/schedule
npm install --save-dev @types/cron
Step 2: AppModule
// app.module.ts
import { Module } from '@nestjs/common';
import { ScheduleModule } from '@nestjs/schedule';
import { TasksModule } from './tasks/tasks.module';

@Module({
  imports: [
    ScheduleModule.forRoot(),
    TasksModule,
  ],
})
export class AppModule {}
Step 3: Task Service
Here we'll use child_process to run commands.
// tasks.service.ts
import { Injectable, Logger } from '@nestjs/common';
import { Cron, CronExpression } from '@nestjs/schedule';
import { exec } from 'child_process';
import * as fs from 'fs';
import * as path from 'path';

@Injectable()
export class TasksService {
  private readonly logger = new Logger(TasksService.name);

  // ✅ Database backup every night at midnight
  @Cron(CronExpression.EVERY_DAY_AT_MIDNIGHT)
  async handleDatabaseBackup() {
    this.logger.debug('📦 Starting daily database backup...');

    const backupDir = path.join(__dirname, '..', '..', 'backups');
    if (!fs.existsSync(backupDir)) {
      fs.mkdirSync(backupDir);
    }

    const timestamp = new Date().toISOString().replace(/[:.]/g, '-');
    const backupFile = path.join(backupDir, `backup-${timestamp}.sql`);

    // 👉 If MySQL
    const mysqlCommand = `mysqldump -u ${process.env.DB_USER} -p${process.env.DB_PASSWORD} ${process.env.DB_NAME} > ${backupFile}`;

    // 👉 If Postgres (comment/uncomment as needed)
    // const mysqlCommand = `PGPASSWORD=${process.env.DB_PASSWORD} pg_dump -U ${process.env.DB_USER} -h ${process.env.DB_HOST} ${process.env.DB_NAME} > ${backupFile}`;

    exec(mysqlCommand, (error, stdout, stderr) => {
      if (error) {
        this.logger.error(`❌ Backup failed: ${error.message}`);
        return;
      }
      if (stderr) {
        this.logger.warn(`⚠️ Backup warning: ${stderr}`);
      }
      this.logger.debug(`✅ Backup saved to: ${backupFile}`);
    });
  }
}
Step 4: Keep database config in .env file
DB_HOST=localhost
DB_USER=root
DB_PASSWORD=secret
DB_NAME=mydatabase
Step 5: Run it
npm run start:dev
Every night at midnight, files like /backups/backup-2025-08-20-00-00-00.sql will be created.
Let's see how to auto-upload these backup files to AWS S3 (within the cron job itself)?
Step 1: Install AWS SDK
npm install @aws-sdk/client-s3
Step 2: Keep S3 Credentials in .env
AWS_REGION=ap-south-1
AWS_ACCESS_KEY_ID=your-access-key
AWS_SECRET_ACCESS_KEY=your-secret-key
AWS_BUCKET_NAME=my-db-backups
Step 3: Update Task Service
// tasks.service.ts
import { Injectable, Logger } from '@nestjs/common';
import { Cron, CronExpression } from '@nestjs/schedule';
import { exec } from 'child_process';
import * as fs from 'fs';
import * as path from 'path';
import { S3Client, PutObjectCommand } from '@aws-sdk/client-s3';

@Injectable()
export class TasksService {
  private readonly logger = new Logger(TasksService.name);

  private s3 = new S3Client({
    region: process.env.AWS_REGION,
    credentials: {
      accessKeyId: process.env.AWS_ACCESS_KEY_ID,
      secretAccessKey: process.env.AWS_SECRET_ACCESS_KEY,
    },
  });

  @Cron(CronExpression.EVERY_DAY_AT_MIDNIGHT)
  async handleDatabaseBackup() {
    this.logger.debug('📦 Starting daily database backup...');

    const backupDir = path.join(__dirname, '..', '..', 'backups');
    if (!fs.existsSync(backupDir)) {
      fs.mkdirSync(backupDir);
    }

    const timestamp = new Date().toISOString().replace(/[:.]/g, '-');
    const backupFile = path.join(backupDir, `backup-${timestamp}.sql`);

    // 👉 MySQL Backup Command
    const backupCommand = `mysqldump -u ${process.env.DB_USER} -p${process.env.DB_PASSWORD} ${process.env.DB_NAME} > ${backupFile}`;

    exec(backupCommand, async (error, stdout, stderr) => {
      if (error) {
        this.logger.error(`❌ Backup failed: ${error.message}`);
        return;
      }
      if (stderr) {
        this.logger.warn(`⚠️ Backup warning: ${stderr}`);
      }

      this.logger.debug(`✅ Backup saved locally: ${backupFile}`);

      // 📤 Upload to AWS S3
      try {
        const fileStream = fs.createReadStream(backupFile);

        const uploadParams = {
          Bucket: process.env.AWS_BUCKET_NAME,
          Key: `db-backups/backup-${timestamp}.sql`, // File name with folder
          Body: fileStream,
        };

        await this.s3.send(new PutObjectCommand(uploadParams));

        this.logger.debug(`☁️ Backup uploaded to S3: backup-${timestamp}.sql`);
      } catch (err) {
        this.logger.error('❌ S3 Upload Failed', err.message);
      }
    });
  }
}
Step 4: Run it
npm run start:dev
- Every night at midnight, backup file will be created.
- Then it will automatically upload to AWS S3 as
db-backups/backup-xxxx.sql.


